TL;DR: CPU Intensive tasks take up tons of RAM. They turn to be headaches for many developers. Here’s how we solved the issue with AWS Batch.

So what are CPU Intensive tasks?
They are complex user actions that eat up more RAM. A few of such processes can shut down your server entirely.
Naturally, you want to make sure that your app or website is ‘smart’ enough to handle different kinds of tasks, for each individual user request. Here’s how you can do this.
What solution are we looking for?
- All processes are completely isolated
Each task should be processed separately. Otherwise, the processes can impact each other and even break the flow.
- You can configure RAM & CPU for each task
Our ‘perfect’ solution should be easy to customize. Ideally, we’d like set the max & min RAM for each task.
- The solution supports containers
This is the matter of convenience. In case, you already have ready-made solutions on your Docker image, they would be easier to integrate.
- Create queues for various tasks
This is used for managing the max amount of tasks & calculate the end price.
- Pay just for the resources we use
As you will see below, many tools require to pay extra, for the resources you’ve never used.
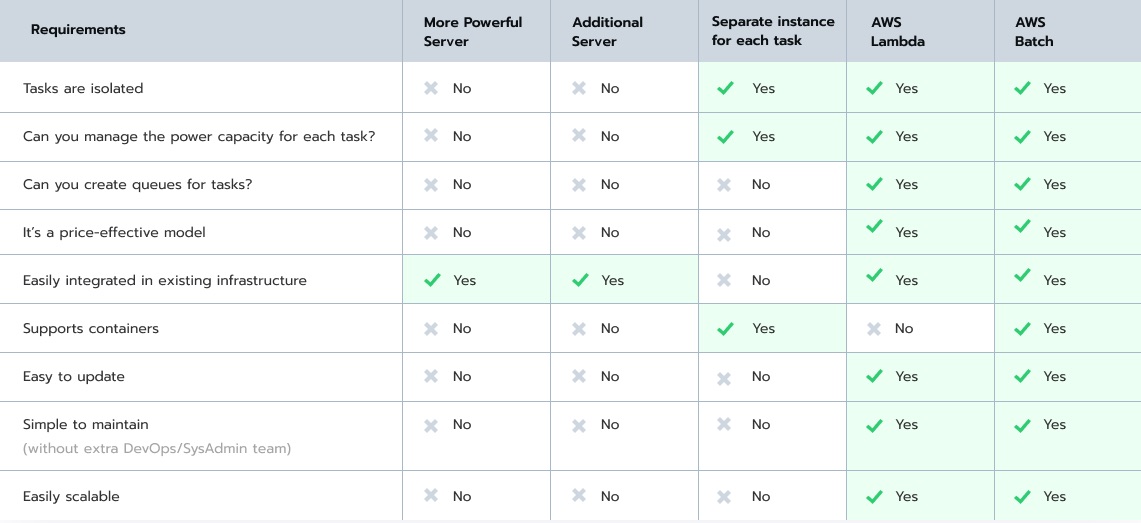
So we compared 5 different solutions using these criteria. Check the table above.
What are the options for handling CPU Intensive tasks?
1. More Powerful server
The first solution that comes to mind is to buy more powerful hardware. Yes, a better, more advanced server seems simple and effective. But just at first. The processes are not isolated, which means that no matter how powerful/advanced your server is – it still might go down.
The tasks can impact the performance of your main server, which will result in the down time for your web or mobile app. Besides, the new powerful hardware might get expensive, and your monthly spend on maintenance can get to the moon.
Even though this is a very simple solution, it simply doesn’t work in our case.
2. Additional server
Since a single server didn’t work out, could we install a separate server next to our main hardware? It will handle all tasks related to processing. As the result – they won’t impact the performance of your major server.
But here’s a caveat. This option is far from being cost-effective. Think about it – besides the main server, you need to purchase another, very powerful hardware. The monthly maintenance costs will stay all time high. On top of this – you will have to pay for the resources you do not use.
Let’s say, you mostly have traffic at night. During the daytime – there’s literally just few vagabonds using your app/website. So your servers stay there completely useless, gathering dust. They don’t process any requests, but you are still going to pay the hefty bill.
3. Separate instance for each task
Ok, take 3.
What if we use a separate instance for each CPU intensive task? We jumped to this solution also, since it has a very obvious advantage – it’s completely software-based. It’s also extremely flexible.
You’ll need to launch a new instance, wait till the process is finished and then put it down. In addition, it’s price-effective and isolated, which is exactly what we want.
But it wasn’t a 100% match. It turns out that the entire process (you launching the instance, processing the task, destroying the instance) is done manually.
This also means that in case of unexpected mistakes, your instance may not get destroyed and it will continue working. This is not easy to fix, nor is it cost-effective. In the end, you will find yourself spending time/money on something, that should have been there from the very beginning.
There’s another disadvantage too. Say, you want to create a queue of all the tasks that should be performed in a sequence, thus not simultaneously. But this feature isn’t there by default. So you will have to set it up using manually. This also makes debugging hard, which is why…let’s move on to the next solution.
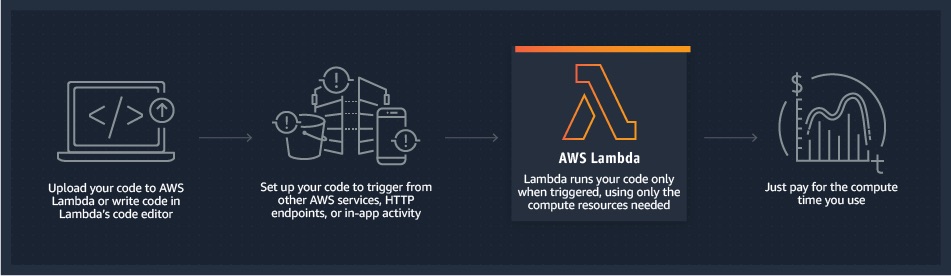
4. AWS Lambda
It looks great at first sight, since AWS Lambda was created with this exact goal in mind. All tasks, processes are isolated, you can create queues for your tasks, it’s easily integrated into your existing eco-system.
 AWS Lambda
But the major downside here is that AWS Lambda is extremely limited. For instance, the max time for executing any task is 15 mins, set up by default. The CPU & RAM resources are restricted.
If you have highly CPU intensive tasks, Lambda is just not worth it. The costs will skyrocket. It just stops being price-effective if you use it for a long time.
Nevertheless, Lambda might be an excellent solution for small CPU intensive tasks.
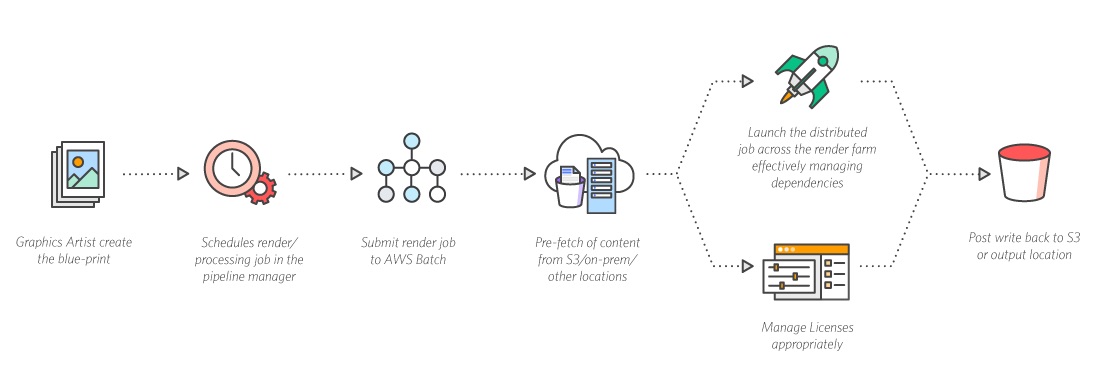
5. AWS Batch
Meanwhile, AWS Batch gives you 100% control over all your load. What’s more – it’s convenient & easy to customize. For instance, you can restrict the number of CPU intensive tasks performed at the same time. You can also configure the settings for each process just the way you wish.
 AWS Batch
Batch is easily integrated with AWS services & Docker. Without any extra efforts, you can link your Docker file & set the desired parameters. You then can launch the tool without any fuss. It’s super simple. Besides, you cam manage everything through your Docker file too.
With AWS Batch you can track your costs more effectively. Just set the max price for a certain time frame, which lets you predict how much money you need for deployment. This is optimal for your business, since you can calculate the end price. You also don’t have to pay anything extra. if you have 0 visitors, you can pay 0$. Fair play.
AWS Batch fits perfectly with your server-less stack. Let’s say one of your servers is using AWS Lambda. This won’t be an issue, since AWS Batch is easy to integrate & personalize.
AWS Batch doesn’t have any limits for power capacity. You can play with it, go crazy and set even 300Gb of RAM for your app/website. 🙂
How to Run a Command that Starts a Separate ‘Rocket’ for each user
Setting up AWS batch is simple too, in case you haven’t yet. This Amazon guide will give you a good idea of how this works. What’s more, using an AWS wizard, you can create a job definition, set up your computer environment and submit your first job.
Also, if you already have a Docker image that you wish to launch in AWS Batch, you can create a job definition using it.
So how do you launch ‘a rocket’ for each individual user? Basically, use this template:
const comand = "npm run rocket"
const newJob = await new Promise((resolve, reject) => {
batch.submitJob(
    {
          jobName: "your_important_job",
          jobDefinition: "killer_process",
          jobQueue: "night_users",
          timeout: {
             attemptDurationSeconds: 600
          },
          retryStrategy: {
             attempts: 1
          },
          containerOverrides: {
             vcpus: 2,
             memory: 2048,
             command: [comand]
          }
     },
     (err, data) => {
          if (err) {
             console.error(err.message);
             reject(err);
          }
          resolve(data);
     }
 );
});
Afterward, we will receive the logs of the work results. If you want to receive more details regarding errors, you can use AWS SNS (Simple Notification) and AWS SQS (simple queue).
In case you want more advanced error handler or wish to send results to another handler -> SNS (Simple Notification Service) or SQS (Simple Queue Service).
Every finished job will be marked as ‘done’. Also, with the help of AWS you can trigger another job and analyze your errors more thoroughly.
Bottom Line: CPU intensive tasks
Well, that’s it. Here’s how you run CPU Intensive tasks for each user using AWS Batch console. Hope this article was helpful & let us know if there are any other questions.