Intro: QA Documentation
Human errors can lead to defects at all stages of software development, and the consequences of them can be very different — from minor to catastrophic. The QA process allows you to find and correct defects, reduce the level of risk, and improve the product’s quality.
Given the complexity of today’s IT products, it is difficult to imagine a situation when the development process goes without any testing. Usually, we deal with deadlines, the team’s skills, and the product’s requirements which are continually evolving — and here, you cannot go without proper QA documentation.
We have collected and organized information about creating test documents to share with you. This guide should be useful for both QA newbies and other specialists who want to simplify their work or understand how their development team should be functioning.

What is Included in QA Documentation?
QA testing carried out at all stages of development can significantly improve the system’s quality, reliability, and performance. During testing, the QA team makes sure that the software product performs all the documented functions and does not do what it should not.
What can we include in the QA documentation? Usually, these are the following types of test documents:
- Test plan
- Checklist
- Test case
- Bug report
- Traceability matrix
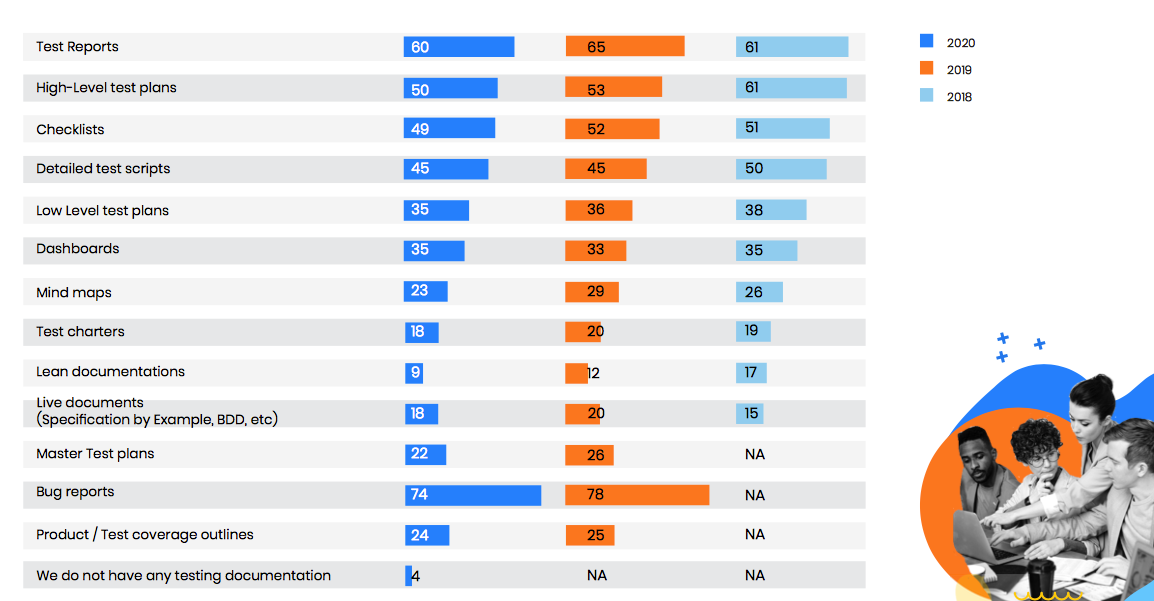 Image credits: State of testing report by Practitest.com
Although this is internal documentation, its users are also people who want to work with clear information. A unified approach to design, combined with care for the potential reader, simplifies the entire team’s work.
There are situations when the incorrect understanding of test cases leads to missed bugs and, as a result, customer dissatisfaction. Let’s look at how each of these documents should be created to be reliable, structured, and user-friendly.
Test Plan
It is a document that describes the entire scope of testing work and the resources required for this purpose. This QA doc is created at the initial stage of the project when the requirements are collected, the terms of reference are formed, the scope of work, and the list of tasks become clear.
Why do we make a test plan?
The professionally created test plan is an example and indicator of the team’s professionalism. Besides, this test document offers many advantages:
- This is a guide for the testing process. It defines your approach to testing and describes the testing methods you need to follow.
- It contains detailed information about the testing area and business objectives of the product.
- It helps determine the time and effort required to test the product.
- It clearly defines the roles and responsibilities of each team member.
- It provides a testing schedule. Hence, it provides you with a basic timeline to monitor and track your team’s progress.
- It specifies the resource requirements and hardware requirements to conduct the testing process successfully.
Elements of a test plan
A test plan may contain the following elements:
- Document identifier. It is an essential part of a test plan that specifies the date of document creation, the project’s name, version (starting from the second one), date of editing (if there are changes or additions). Example: 01/15/2020 Project1 Test Plan (edited 20.01.2020).
- The introductory part includes a description of the test object: systems, applications, the goals and objectives of the subsystem.
- Approaches to testing. At this point, you need to describe the testing strategy in detail. It includes entry criteria, test methods (manual, automated), test types (functional, installation, regression, new feature, compatibility, integration, localization, etc.), test levels (smoke, critical, extended).
- Resources. It is the stage when the required equipment and/or devices, testing programs, software, applications for test case management are specified.
- List of tasks and goals to be achieved.Here we specify the applications to test. If the project is small, then proceed to the point ‘Features to test’.
- Features to test (sometimes features that should not be tested). This section contains information about which components and functions need to be tested and which will not be tested.
- The team. Describe how many people should be involved and what knowledge/skills they should have to complete all the testing tasks. If required, schedule training sessions.
- Work schedule. List all the key dates when a particular test should be performed. If there are no clear dates while writing a test plan, focus on the milestones that you can link to (for example, you will conduct regression testing at a specific time and prepare certain documents or reports).
- Item pass/fail criteria. Specify the quality level that the product must meet for the customer to accept it. For example, you agree that there will be no known defects with critical or major priority at the time of release. Or you claim that 80% of test cases should be automated. Such criteria will allow the client to understand that the product is high-quality and ready for end-users.
- Risk assessment with ways to avoid them. There you can and should prescribe those negative scenarios that may occur during the project. Typical risks: test data is not provided in time; components from third-party vendors do not work; there is no necessary device for testing. Each specified risk must have a specified probability of occurrence, the potential damage that it can cause, the responsible person, and measures to prevent or deal with the consequences. Of course, at the start of the project, you will not take into account absolutely everything. Therefore, the test plan should be adjusted in the course of work.
- Documentation. List all types of documents that you will use on the project. Specify what they will include. These can be checklists, test cases with descriptions of basic fields, and reports that you will provide to project managers, client representatives, and others. Specify the frequency of preparation of these documents and responsible persons.
Usually, the test plan is prepared by the most experienced QA specialist on the project. After, it is sent to the QA Manager for approval. The test plan covers all testing stages of the project: functional, automated, security testing, etc. The general document is called the Master Test Plan. However, in some situations, it may only cover one or more testing levels — the Level Test Plan.
How to write a test plan
As a rule, you can write a quality test plan by following these steps:
1. Analyze the product
The first step to creating a test plan is to analyze the product, its features, and functionality to gain a deeper understanding. Also, learn the business requirements and what the customer wants to achieve from the final product. Understand users and use product testing capabilities from the user’s perspective.
2. Develop a testing strategy
Once you have analyzed the product, you are ready to develop a testing strategy for different levels. Your testing strategy may consist of several testing methods. By following the business rules and requirements, you decide which testing methods will be used.
3. Define the scope
A good test plan clearly defines the testing area and boundaries. You can use the requirements specification document to determine what is included in the scope and what is excluded.
4. The development schedule
When being aware of the testing strategy and scope, you can develop a testing schedule. Divide the work into testing stages and evaluate the necessary efforts. You can also assess the resources required for each task. Now you can include a test schedule in your test plan, which will help you monitor the testing process’s progress.
5. Define roles and responsibilities
A good test plan clearly lists the roles and responsibilities of the test team and the team manager. The roles and responsibilities section, along with the schedule, tells everyone what to do and when to do it.
6. Anticipate risks
Your test plan will be incomplete without the expected risks, mitigation methods, and risk responses. There are several types of risks when testing software, such as schedule, budget, skills, knowledge, etc.
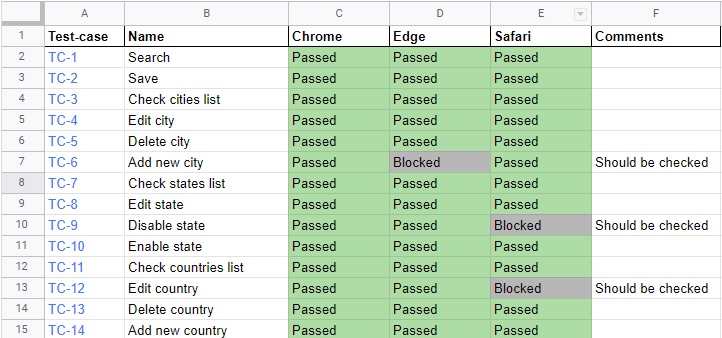
Сhecklist
A checklist is a list of testing scenarios grouped by modules. QA first creates a checklist in TestRail or Google Sheets and then expands it to detailed test cases. By crossing out the list items, the team (or even one tester) can better understand the current state of work performed and the quality of the product.
When you are working on a project based on a checklist, you can significantly reduce the need for re-checking the same cases. Besides, the quality of testing improves, as the risk of ignoring some functionality is significantly reduced. Therefore, it is a surprisingly useful tool, especially for teamwork.
 Checklist
What blocks does the checklist consist of
- General information (for example, a link and log in details to the website).
- Name of the section (subsection).
- List of checks (with the required level of detail).
- Type of verification (positive, negative).
- Test data.
- The expected behavior of the system.
- Information about the test environment: device, browser, screen resolution, etc.
- Check result (passed, failed, not executed).
- Bug number or a link to it in Jira (if the test is not passed).
A checklist is a relatively simple document. Here are few useful hints on creating it:
- Add a complete list of modules, pages, sections, or other elements that need to be tested.
- Items can have either a linear structure or a tree structure and have sections and subsections.
- It should be formulated concisely, but at the same time understandable to other testers.
- Make the wording unambiguous to avoid incorrect interpretation. For example, “go to documents” sounds ambiguous because it can mean both parts of the program and downloaded files. It is better to write “go to the documents model.”
- Use the same language everywhere.
When going through the checklists, the tester marks the status. The following status options are available:
- “Passed” — check passed successfully, no bugs found.
- “Failed” — one or more bugs found.
- “Blocked” — cannot be checked because one of the bugs blocks the current check.
- “In Progress” — the current issue that the tester is working on.
- “Not run” — not checked yet.
- “Skipped” — will not be checked for any reason. For example, the current functionality has not been implemented yet.
For better clarity, as a rule, each of the statuses has its own color.
The advantages of using checklists
- Checklists help to structure the employee’s information.
- If the necessary actions are appropriately specified, the employee has a precise understanding of the tasks. This helps to increase the speed of training of new employees.
- Checklists help to avoid uncertainty and errors related to the human factor.
- The degree of interchangeability of employees increases.
- The checklist process significantly saves working time. After writing the checklist once, it can be reused, taking into account the relevance of the information.
- Using checklists is one of the techniques to increase the bus factor. In software development, the bus factor of a project is a measure of the concentration of information among individual project members.
A good checklist is one of the types of QA documentation that describes what needs to be tested. How detailed the checklist will be, depends on the reporting requirements, the level of knowledge of the product by employees, and the product’s complexity.
Test Case
A Test Case is a set of specific prerequisites and steps required to test the implementation of a particular function or part of it. It is preferable to allocate enough time for writing test cases because pre-prepared test coverage guarantees that it will be as complete as possible, and all functional areas will be covered with tests.
 Test case
Structure of a test case
- Number — a unique identifier of the test case.
- Title — a brief description of the essence of the check.
- Type — a type of verification (positive, negative).
- Test data — data that will be used to perform the test.
- Preconditions — actions that must be performed before the test, but they are not directly related to the test.
- Steps — this section describes the actions required for testing.
- Expected — what we expect to get after completing the steps.
- Actual result — how the system actually works.
- Postconditions — actions that must be performed after the test.
- Status of the test — passed/failed.
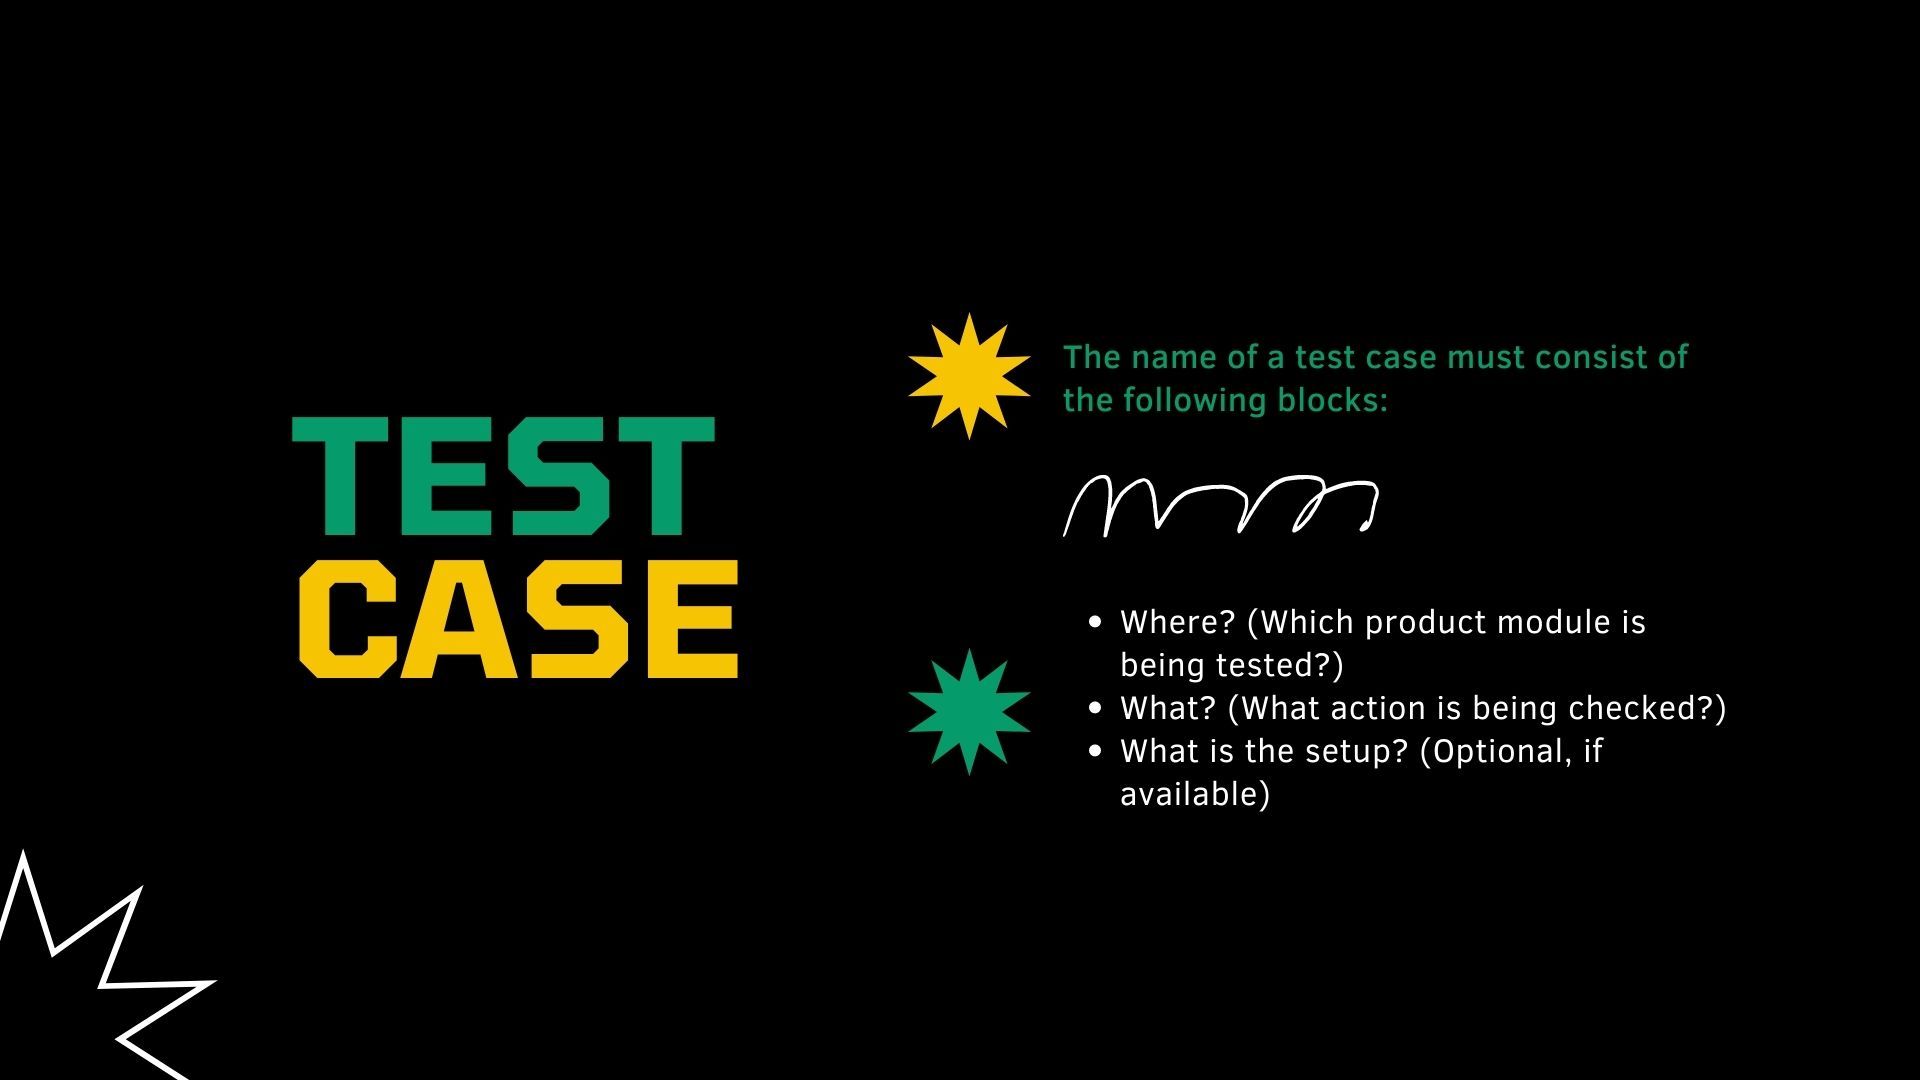
The name of a test case must consist of the following blocks:
- Where? (Which product module is being tested?)
- What? (What action is being checked?)
- What is the setup? (Optional, if available)
For example, “Users. Invite. With group creation” or “Documents. Download. Original file». The name should be short, but at the same time as informative as possible.
If necessary, you can add variables in square brackets in the test case name (different file types, user types, etc.)
For example:
- Documents. Download. Original file [docx]
- Documents. Download. Original file [xlsx]
- Documents. Download. Original file [pptx]
Also, pay attention to the rules for describing the steps of test cases:
- Each step should be concise and start with a verb in the initial form (answer the question “What to do?”- “To click”, “To copy”,”To transfer”).
- You do not need to make links to other steps in this test case (such as “Save changes and go back to step 4”). After all, test cases can be edited, copied, and potentially such links are even more confusing.
- It is better to write individual interface elements and objects with a capital letter and take them in <> (to better structure the text).
- Each step should describe one action (it is advisable to avoid combining several steps into one).
- The expected result must be for the last step and optional for the previous ones.
Regarding the preconditions, this is the information about what needs to be done before the first testing stage. This process may include various additional settings, invited users, added files or folders, and certain options that differ from the standard ones. It is better to present this information in the form of a table; visually, it will be better perceived.
The differences between a high-level and low-level test case
A high-level test case (or a logical test case) is a test case without specific input data and expected results. As a rule, it is limited to general ideas and operations, similar to the checklist’s detailed item. It is quite common in integration testing and system testing and at the level of smoke testing. It can serve as a starting point for conducting research testing or for creating low-level test cases.
A low-level test case is a test case with specific input data and expected results. It is a “ready-to-run” and the most classic type of test case.
When talking about test plan vs. test case, it is essential to note that the difference is quite evident. A test plan is a document that describes the entire scope of testing activities, starting with the description of the object, strategy, schedule, criteria for the start and end of testing, to the equipment required in the process of operation, special knowledge, risk assessment, etc. A test case is the smallest software test document that describes a typical and atypical situation that occurs when using the product.
Best practices for writing a successful test case
1. Make sure to understand the requirement for which the test case is created
You will not be able to create and describe a convincing test case if you do not understand precisely how this or that functionality of the program should be implemented. It will be more useful to spend time and effort on clarifying inaccuracies and eventually write a “working” test case.
2. Stick to simplicity and ease of understanding
Describe the test case in clear words, without using special terminology and complex language structures. Experienced and novice testers, project managers, developers, and those employees who do not have sufficient IT knowledge may work with it.
3. Number of steps
If the number of steps is minimal (2-3), there is no need to describe this check within a separate case; it may be considered one of the checklist items. On the other hand, an excessive number of steps (more than 10-15) will make the case overloaded and difficult to understand and perform.
4. Combine tests of similar functionality
Testing a single functionality should be combined into separate sets and scenarios. This will help to get the more efficient organization of document storage.
5. Keep the test cases up-to-date
For the test documents to be not just declared, but to facilitate and improve the process, it must always be kept up-to-date. Test cases are no exception. It is also important to remember to add new ones and delete existing ones.
Bug Report
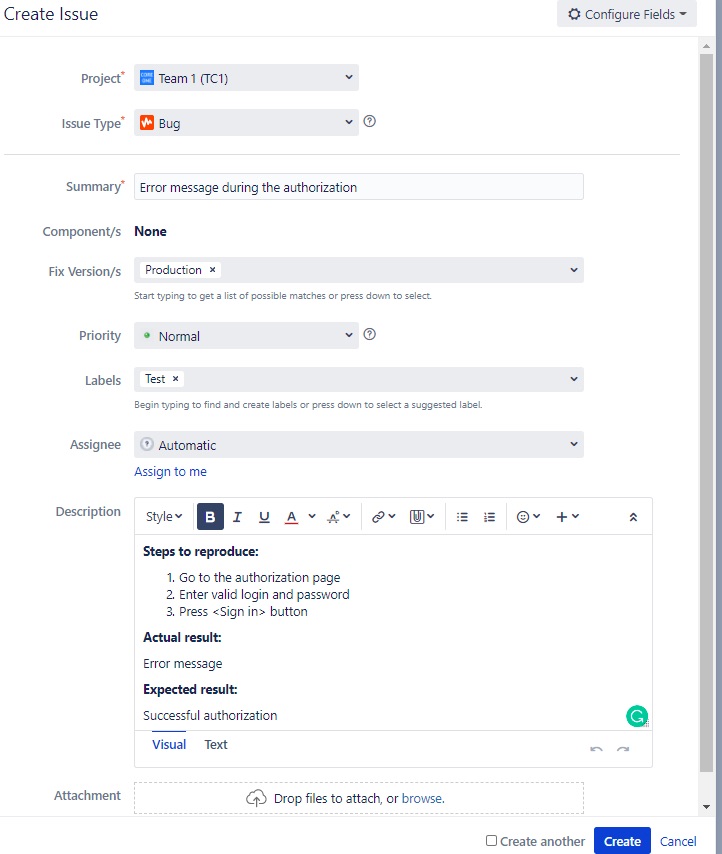
A bug report is a technical test document that contains a complete description of the bug with information about both the error itself (brief description, severity, priority, etc.) and the conditions for its occurrence. The bug report must contain the correct unified terminology that describes the user interface elements and events that cause the bug.
 Bug report
Bug report components
- Brief description of the problem (Answer three questions sequentially. WHAT is not working? WHERE does the issue occur? WHEN is this problem reproduced?).
- Project name.
- Component of the application where the defect occurred.
- Version of the build where the bug was found.
- Severity (Blocker/Critical/Major/Minor/etc.).
- Priority (High/Medium/Low).
- Status (New/Feedback/Acknowledged/Accepted/Assigned/Resolved/Closed).
- Author (Who created the bug report/reported by).
- Assignee (Who should fix the defect).
The bug description itself may contain the following parts:
- background (optional);
- steps to reproduce (description of the steps that lead to the bug);
- actual result (the result that we come to when we complete all the steps);
- expected result (the result that should have been per the requirements).
It is useful to add screenshots, test files, or other documents to help developers solve the problem.
It is preferable to describe the bug in detail, correctly and clearly, so that developers have to ask less clarifying questions. In Jira, you can customize the necessary fields and add specific templates, making it a little easier for you to create new bug reports.
The main mistakes when creating bugs reports:
Insufficiency of the data provided
It is not always the same problem that occurs with all the values entered and under any logged-in user, so it is strongly recommended to enter all the necessary data in the bug report.
Determining severity
There is often either an overestimation or an underestimation of the severity of the defect, which can lead to incorrect priority when solving the problem.
S1 Blocker
A blocking error causes the application to become inoperable, as a result of which further work with the system under test or its key functions becomes impossible. The solution to the problem is necessary for the further functioning of the system.
S2 Critical
A critical error means either an essential business logic does not work properly or a problem that temporarily crashes the server or causes some part of the system to fail. The solution to the problem is necessary for further work with the system’s key functions under test.
S3 Major
It is a significant error while a part of the main business logic is not working correctly. The error is not critical, or it is possible to work with the function under test using other input points.
S4 Minor
This type of bug does not break the business logic of the application part being tested.
S5 Tweak
It is some sort of inconvenience, the obvious problem of the user interface. It means that you need to increase the degree of user-friendliness of the interface.
S6 Text
A small text error/typo. Punctuation or spelling error.
S7 Trivial
A trivial bug does not concern the business logic of the application. It is a poorly reproducible problem that is barely noticeable through the user interface. This problem does not have any impact on the overall quality of the product.
Language of description
Often, when describing a problem, incorrect terminology or complex speech patterns are used, which can mislead the person responsible for solving the problem. Make sure to avoid this mistake.
The absence of the expected result
In cases where you have not specified the system’s required behavior, you spend the developer’s time searching for this information, thereby slowing down the correction of the defect. You must specify a point in the requirements, a written test case, or your personal opinion if this situation has not been documented.
 Bug report
Traceability Matrix
Traceability matrix is another type of QA documentation in the form of a table that checks compliance with the product’s functional requirements and prepared test cases. At the intersection of the corresponding row and column, put a mark indicating that the test case covers this requirement.
 Traceability matrix
Thus, this tool provides a visual representation of the following parameters:
- availability of requirements in the system that are not yet covered by test cases (if the requirements do not have any intersection with test cases);
- redundant testing – if the requirement has several intersections with test cases.
What should the traceability matrix contain? Each line must contain:
- number and description of the task from the task tracker;
- module to which the task belongs (optional);
- acceptance criteria;
- priority;
- number and description of the corresponding test case.
The matrix performs its role correctly only if it is continuously updated. Otherwise, it not only becomes useless but can also confuse testers.
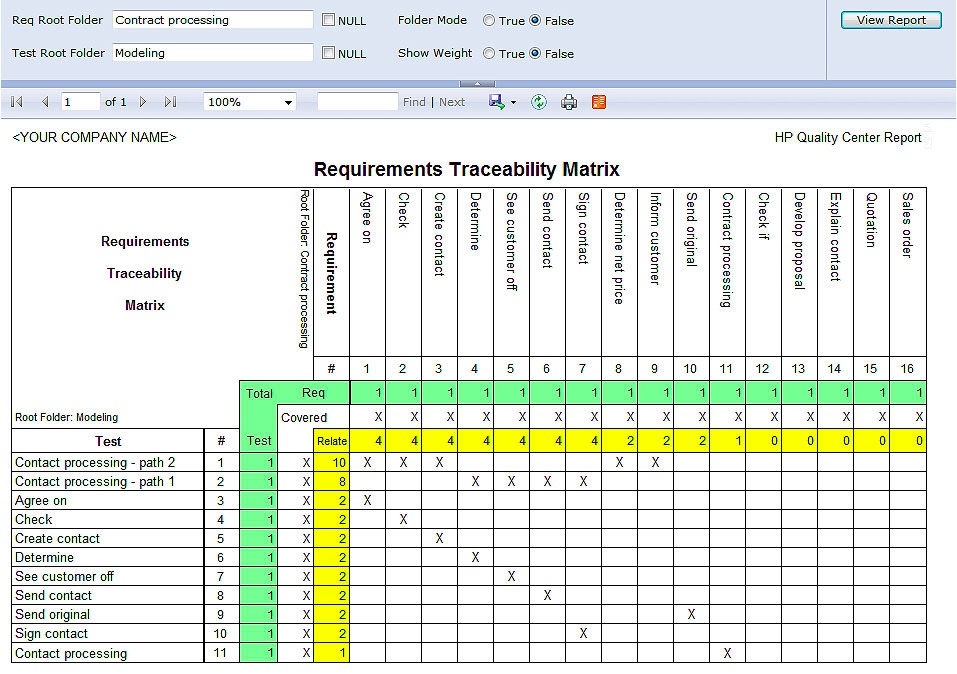 Traceability matrix
Key advantages of using a traceability matrix
- The matrix allows you to monitor the implementation of requirements, make sure that all requirements are developed and tested, and nothing is missed.
- The matrix helps the QA team track whether there is a debt on the test documentation and which requirements are not covered by the test cases.
- The analyst and QA team use the tool to monitor changed requirements.
- On the project, traceability matrices are also used by the product-owner on the part of the customer. So, make sure that all the requirements are correct and tracked with a matrix that has already been implemented. The matrices allow making the development and testing process somewhat more transparent.
Test Strategy vs. Test Plan
A test strategy is a relatively small static document that precedes a test plan. Before writing a long and detailed plan, it is worth formalizing some basic approaches to testing and making sure that all interested parties understand equally what will be tested and how.
The process of creating a test strategy consists of the following steps:
Step 1. The collection of information. At this stage, we study the product and its context. We get information from various sources: conversations with stakeholders, research testing, reading documentation.
Step 2. Information analysis. At the next stage, we try to choose the most crucial information from the whole pile of data to form a strategy. We filter the collected data and keep the most necessary one.
Step 3. Decision-making. Once we have a knowledge base about the product and its context, we are ready to form a strategy. At this stage, it is born. We make decisions about how we will test the product. A set of these solutions will form the basis of the test strategy.
Step 4. Presentation. It does not always reach this stage. Sometimes you just do not get asked about how you test and why. But if asked, you should be prepared to explain your decisions and justify their correctness. When talking about the Test Strategy vs. Test Plan, it is essential to remember the key differences.
Test Strategy vs. Test Plan Table
| Test Plan | Test Strategy |
|---|---|
| A software project's test plan can be defined as a QA doc that defines the scope, purpose, approach, and focus of software testing efforts. | A test strategy is a set of guidelines that explain a test's design and define how testing should be performed. |
| Test plan components include test plan ID, functions to test, test methods, test tasks, test results, responsibilities, schedule, etc. | Testing strategy components include goals and scope, documentation formats, testing processes, team reporting structure, customer engagement strategy, etc. |
| The test plan is created by a QA Manager or a QA lead who describes how to test, when to test, who will test, and what to test. | The project manager carries out the testing strategy. It tells you which type of technique to follow and which module to test. |
| The test plan describes the specification. | The test strategy describes common approaches. |
| The test plan can be changed. | The test strategy cannot be changed. |
| Testing planning is carried out to identify possible problems and dependencies to identify risks. | This is a long-term plan of action. You can abstract information that is not relevant to a specific project and apply it in a test approach. |
| The test plan exists individually. | In a small project, a test strategy is often found as a part of a test plan. |
| The test plan is defined at the project level. | It is defined at the organization level and can be used by multiple projects. |

QA Documentation FAQ
-
What is the role of documentation in QA?The availability of high-quality QA documentation gives many advantages: users do not seek to abandon the product, the technical support is not overloaded, there are fewer questions within the development team about how the product should function, it is easier to sell the product. Working with documentation, writing test cases, and maintaining the relevance of documentation is a daily activity of every QA engineer, which takes a lot of time and effort but guarantees an effective organization of the testing process.
-
What does QA documentation mean?QA documentation is testing documentation that describes the methodology and scenarios with steps to test different criteria for evaluating the software product's quality. Creating QA docs improves the product's quality through closer collaboration, clarifying details when developing the documentation. Test documents include a test plan, test case, bug report, checklist, and other test artifacts.
-
Who is a QA documentation specialist?Such a specialist coordinates and documents internal QA documentation control programs, maintains an archive database for documentation details and location and contributes as the documentation representative on cross-functional project teams.