A prototype can be almost anything, from a series of paper sketches to a fully-functional, pixel-perfect app.
Many product companies use prototypes as their major (if not only) testing instrument. Read this article, and you will:
- Learn more about prototypes in design and software development.
- Differentiate three major forms of prototyping.
- Know how to create a prototype (by using some great tools).
What is a Prototype?
The idea expressed by the founders of IDEO design company, Tom and David Kelley, proves the fact that prototypes not only prevent you from possible design mistakes but also:
- Save time thanks to the previously thought-out structure and blocks arrangement.
- Simplify the work for developers. Following a strict scheme, they will have all the needed info (e.g. the values of image size, distance, etc).
- Facilitate interaction. A prototype works somewhat as a technical task and is guided by all team members, including developers, marketing specialists, etc.
- Increase sales. Correct placement of CTA elements, navigation elements, promo banners, and product cards is super important in terms of sales strategy.
If a picture is worth 1,000 words, a prototype is worth 1,000 meetings.
Forms of Prototypes
Prototypes can come in a variety of forms. They might differ in:
- the level of visualization (low fidelity, high-fidelity)
- interactivity (graphic or static, dynamic)
- a form (paper, digital, and HTML)
Low-fidelity prototyping
Low-fidelity prototypes are often paper-based and do not allow user interactions. They are helpful in enabling early visualization of alternative design solutions, which helps provoke innovation and improvement.
Popular lo-fi prototyping techniques: paper prototype & digital prototype (clickable wireframes).
Paper Prototype
Although being the oldest form of prototyping (and the only one before the advent of computers), paper drafts are still very common at a certain stage of development.
Product companies use paper prototyping mainly for testing product ideas (the earliest development stage) for overly abstract “raw” concepts.
- Accessibility: the only instruments you need to draw a prototype are paper and a pen/pencil. Both are super affordable and accessible everywhere you can be.
- Team building: creating paper prototypes is a fun activity that brings people together and builds team spirit.
- Documentation: unlike digital prototypes, paper prototypes can be stored as documents, quickly annotated, and instantly modified.
- “Not so real”: regardless of the skill of the designer, paper prototypes are a poor substitute for digital systems and difficult in gauging usability.
- Bias: some people might focus their attention on evaluating the not-so-perfectly-drawn prototype itself rather than the idea behind it.
- Lack of intuitive response: paper prototypes deeply rely on the user’s imagination; that creates a hindrance between stimulus and response.
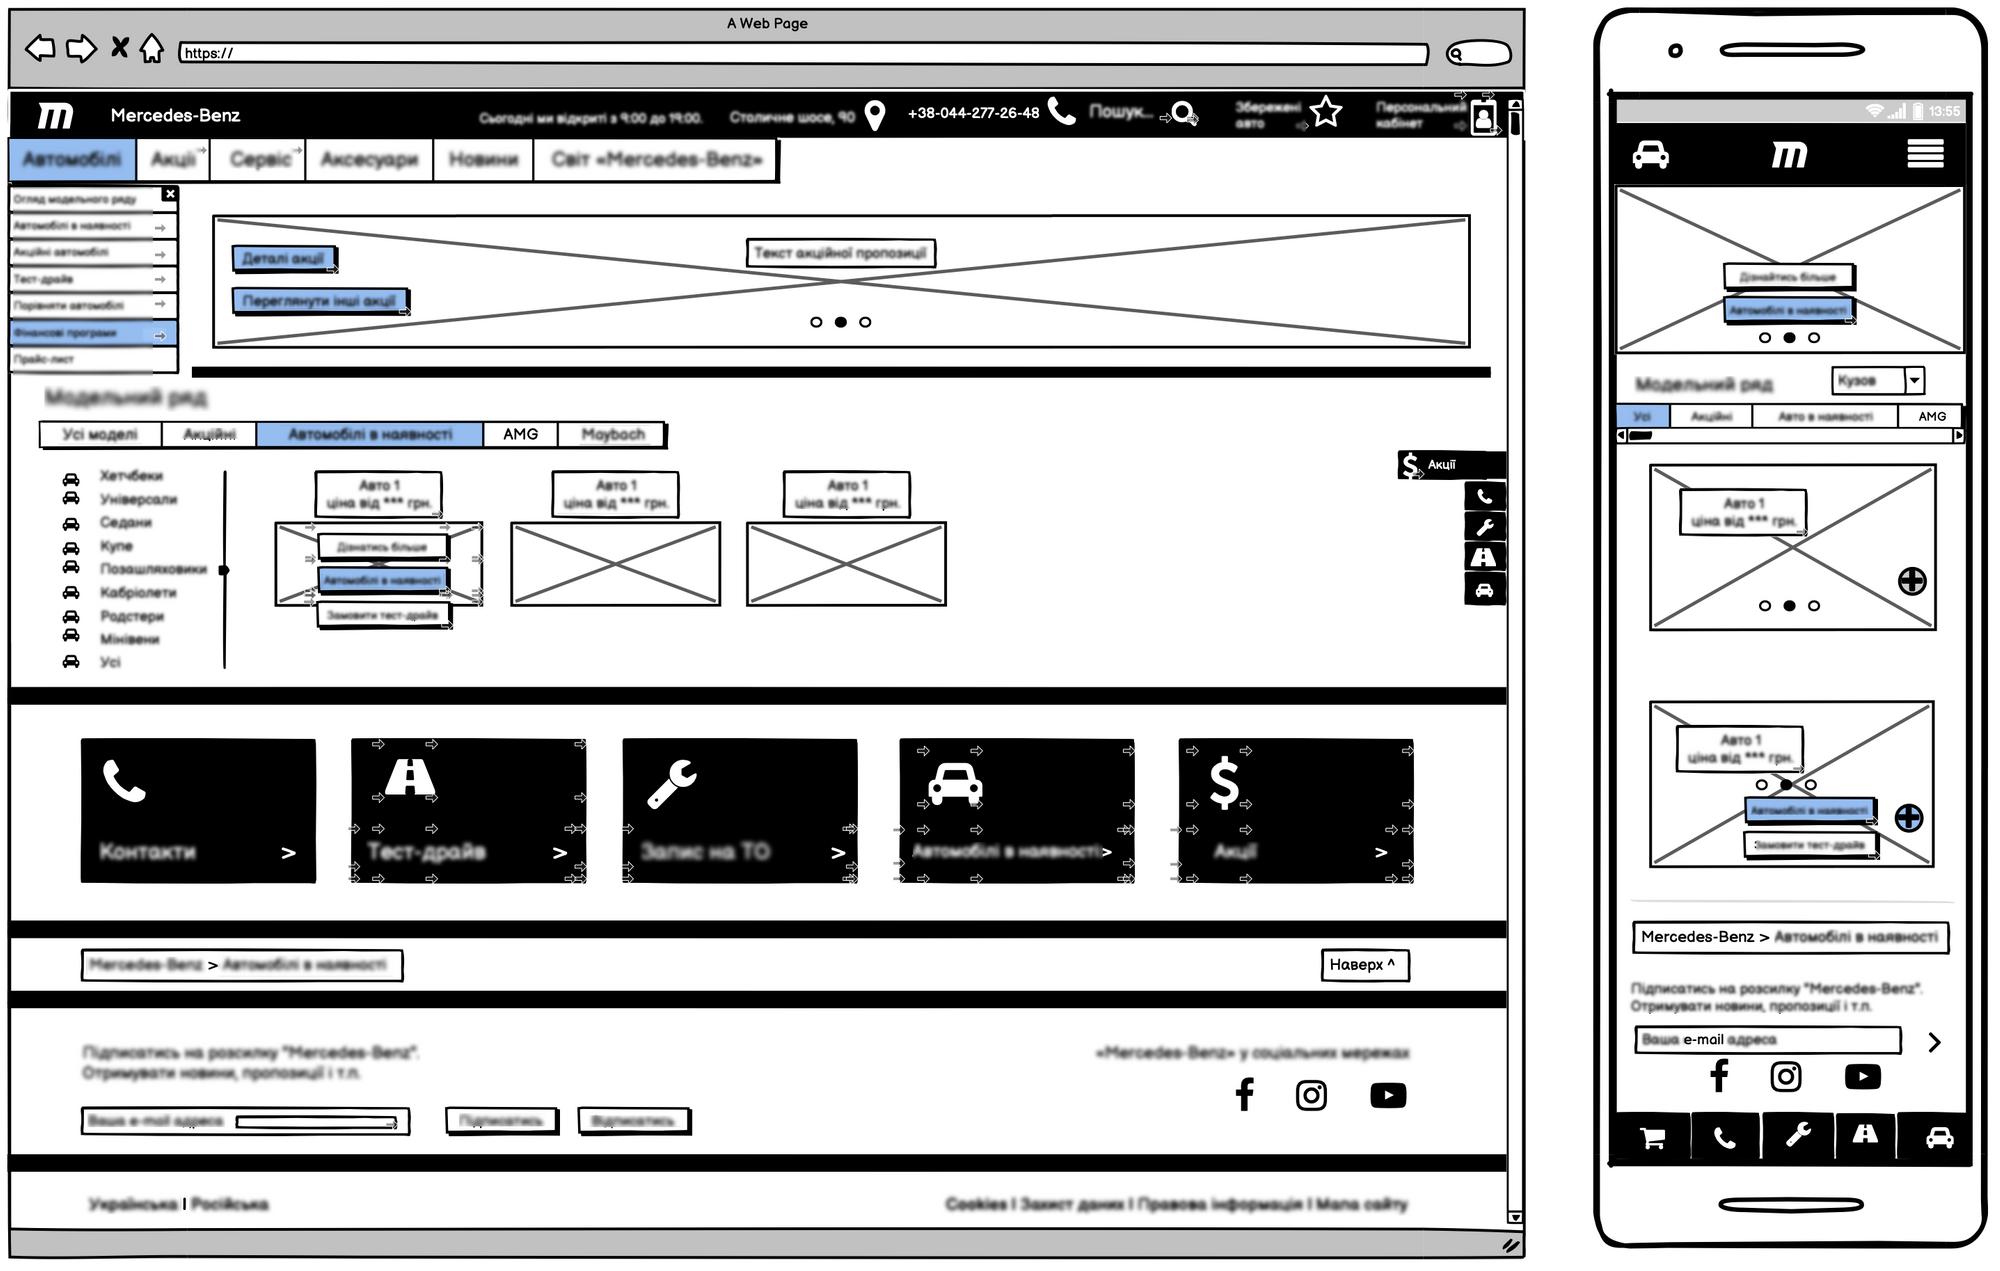
Digital Lo-fi Prototypes
Digital prototyping stands in between the easiest performance of paper drafts and the advanced coded presentation. The digital form is realistic enough to effectively test the main interface elements but easier to create than the coded one.
Developing digital prototypes requires utilizing special apps and software. While the simplest digital prototypes can be done in PowerPoint, it’s common to use one of such tools like Sketch, Figma, Axure Pro, Adobe Photoshop, and many more (we’ll mention a few more below).
What to expect from digital prototyping:
- Realistic interaction: more advanced forms of digital prototyping give you an idea of how well users interact with the product’s interface.
- Flexibility: you may start from a low-fidelity prototype and end up with more a high-fidelity one while improving your draft in the process.
- Speed: it’s unfair to compare paper drafts with digital prototyping in terms of speed (the first one is faster but very primitive). But comparing digital prototypes with their HTML counterparts, the advantage is clear.
- Transition to coding: depending on the chosen software, transforming your design into code can be difficult. Some items may be lost and you’ll need to recreate them from scratch.
High-fidelity Prototyping
High-fidelity prototyping showcases a more detailed app functionality and discloses more channels of user interaction. It’s also used for indicating the user’s full path through the site and eliminating shortcomings in the product’s usability. Hi-fi prototypes let users determine the further scope of work and significantly facilitate the development stage.
With a much better visual quality, high-fidelity prototypes have a more precise hierarchy in typography, colors, and other elements. Schematic blocks turn into images, titles and paragraphs transform into final texts with semantic formulations, and so on.
Overall, the look of a Hi-fi prototype is the closest to a finished product, only without a completed design.
High-fidelity Pprototyping gives a complete understanding of whether the app meets all the planned requirements (sales, user interaction, etc).
Better product visualization for clients: most of them would rather look at a complete design of their product than stare at a schematic mockup.
Ultimately, clients leave more precise feedback. Especially, this is relatable to those design elements, which could not be seen in low- or medium-fidelity prototypes.
Coded prototypes
The HTML prototype form requires coding knowledge, which means it works for a certain group of designers who know the code.
Pros:
- Tech basis for the final product. The coded prototype provides a good base for further programming, which ultimately saves you time and energy.
- Platform independence. You can test this prototype form on any operating system or device. Plus, users won’t need to install additional software to try it.
Cons:
- Dependence on knowledge and skills. Your prototype will be as good as your code. If you are unsure of your skills, it is better to use dedicated software.
- Slows down the creative process. Working with code sets you far from the visual process. As a designer, you won’t be able to evaluate the result, and ultimately, miss out on some aspects of usability.
How to Create a Prototype Using Advanced Design Tools?
Stage 1: Preparatory
Before drawing a prototype of any form and kind, a bit of preparatory work needs to be done. Ultimately, you end up with answers to such questions as:
- Who is the target audience of the particular product (app, landing page, website)?
- What factors make the strongest influence on users as they make a purchase?
- What competitive products do people currently use?
- What are the deliverables?
After calculating the user’s path to the target action in your product and its interaction channels with future users, you can move to the prototype development.
Stage 2: First Concept Sketch ( Low-fidelity Prototype)
Based on the answers you got from stage 1, you may already have some ideas regarding the prototype visualization. It’s okay if those ideas are vague or abstract; those are just a starting point to the entire product development.
Not always is it necessary to create an almost full-fledged high-fidelity prototype. This prototyping form will be relevant for complex long-term projects with multiple specialists involved. If the project is less scalable (e.g. one-page landings) and involves just a couple of people, a schematic sketch might be enough.
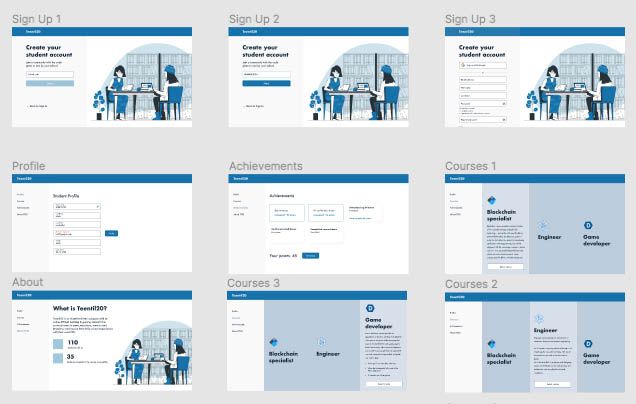
Stage 3: Moving to Digital (Low- to High-fidelity Prototypes)
They slow us down to speed us up. By taking the time to prototype our ideas, we avoid costly mistakes such as becoming too complex too early and sticking with a weak idea for too long.
Creating digital versions of sketches is the first step to formalizing them. While the simplest digital prototypes can be done in PowerPoint, it’s common to use one of such tools like Sketch, Figma, Axure Pro, Adobe Photoshop, and many more.
Make sure everything works smoothly. For example, connecting certain images and buttons to their drop-down menus, functions, landing pages, and more.
Digital prototypes are convenient to make edits. Most software allows both designers and clients to make edits in the currently-developing prototype.
Also, they are accessible from anyplace – both for a team and clients. The software gives chance to work with any team and any client whether they are located nearby or on another continent.
You can use free or paid templates & UIs for websites and mobile apps:
- Freebies for Sketch: sketchappsources.com
- Mockups, UI, UI elements: ui8.net
- Free stock photos: pexels.com
- Icons: flaticon.com
- Fonts: fontsquirrel.com and google.com
Stage 4: MVP
Don’t forget about Post-launch optimization:
- identifying critical customer journey points
- fixing the issues
- tracking the results
Share your interactive prototype with everybody you know, including your stakeholders. Let them test it as well.
Don’t try to fix all your problems at once. Start with building а minimum viable product. The MVP is a product that has just the key functionalities to fix customers’ main problems. This solution has the potential to assist in validating an innovative suggestion for any product.
Build Prototypes Effortlessly with Fulcrum
Prototyping a site or an app is a super responsible work stage with the entire marketing foundation standing behind. And that is why, instead of taking over the process on their own, many companies/startups/services cooperate with specialists.
The Fulcrum.Rocks team is ready to take over this daunting taskю A good prototype saves you time, money and most importantly, ends you up with a better website/app/project.
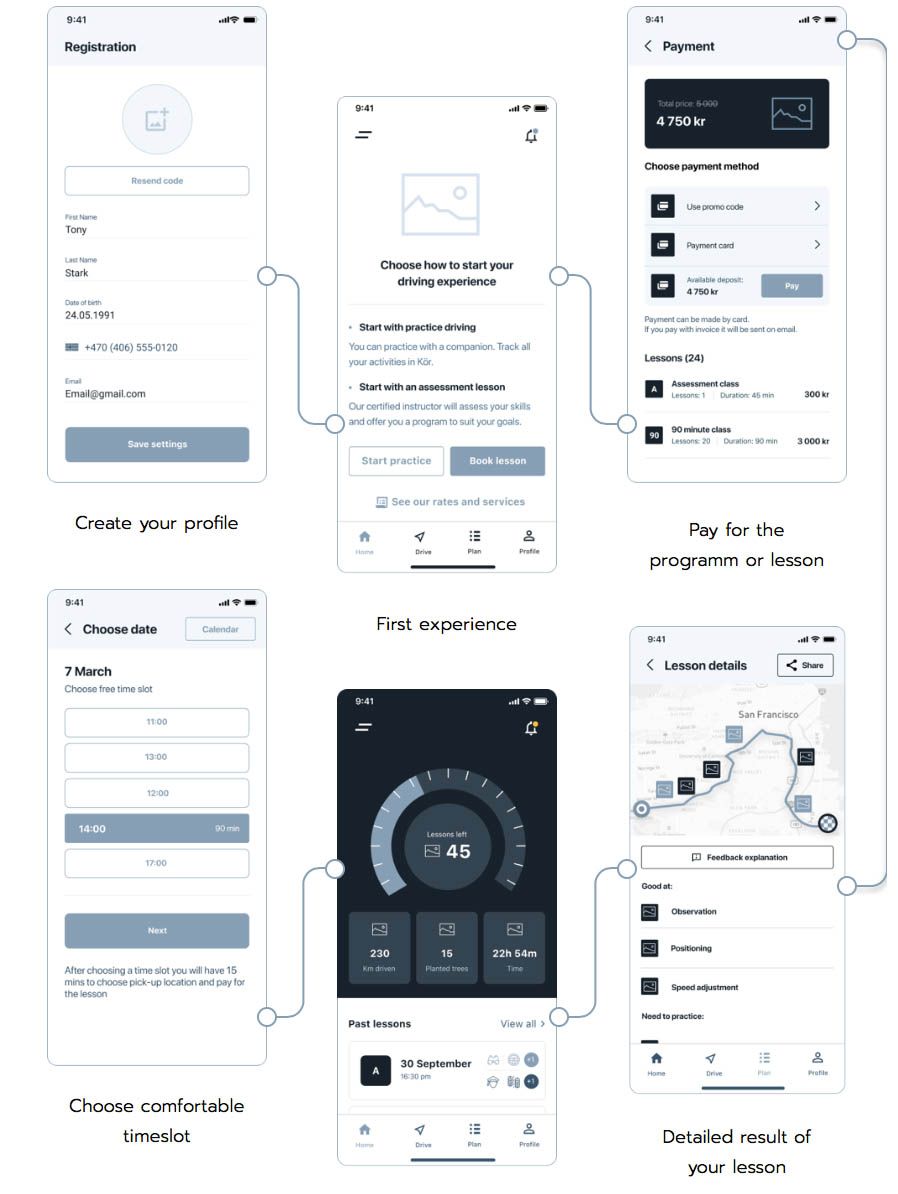
Why Fulcrum.Rocks? KÖR Case Study
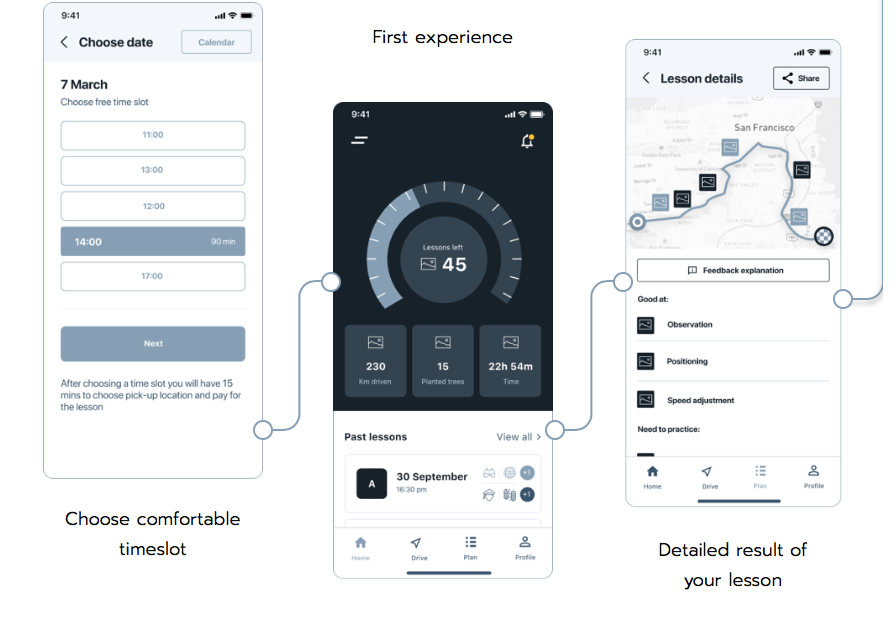
Kör is an online platform in Norway that allows booking driving programs & lessons online. Fulcrum.Rocks team has covered all stages of app development, and a part of our initial discovery phase was designing a high-quality prototype.
After we outlined approximate functionality and flows, we designed app’s wireframes & clickable prototypes:
Fulcrum.Rocks has everything you need to bring ideas to life and transform how you create digital products. If you are interested in learning more about all processes — just contact us! Together, we’ll turn your hypothesis into a profitable project.